HOW TO TAKE PHOTOS FOR REWARDS
NOTE: You must take progress photos this way to be eligible for rewards
Progress Photos Help you See your Results Better!
Your eyes get used to seeing your body every day. Progress photos help you see how your body’s changed.
Everyone who skips taking before and after photos regrets it… so please, do yourself a favor and snap your photos.
It’s easy and takes less than a minute. It’s also required for Support & Rewards so don’t skip this.
HOW TO TAKE YOUR PHOTOS
♥ Where to take your photos: In the same place!
Snap your photos in the same place with the same background. This shows me it’s really you in your home!
Avoid taking your pictures with a lot of clutter in the background.
A plain solid colored background like a blank wall or door works great.
Tip: Take your picture in a room with the most light as possible. Natural light coming in from a large window is best, but any room works as long as it’s well lit. You want the light to be front filled and not overhead or harsh.
♥ What to wear: Show some Skin! This helps you see how your body’s changed.
Wear your favorite bikini or sports bra and shorts.
Avoid wearing undergarments, pants, and long sleeves.
Try to wear the same outfit in both photos. This helps you see changes in your body better!
♥ How to take your photo:
Set your phone up somewhere on a self-timer.
You can use the front-facing camera so you see what you’re taking pictures of.
There are a lot of self-timer apps!
OR, if you have an accountability partner that you feel comfortable with, ask them to snap some pics!
Tip: Avoid selfies in mirrors!
♥ What to take a photo of:
Take a full-length photo of your body from the front
Take a full-length photo of your body from the side
(optional) Take a photo from the back
Take both photos showing your body from head-to-toe, or head-to-knee.
Stand relaxed with your arms down by your side.
Show your face, so I can tell it’s you in both photos.
Stand in the exact same pose when you take both photos, with your feet the same distance apart in your before and after photos. This will help you see changes in your body better.
Tip: Use grout lines in tile or put a book in between your feet so they’re the same distance apart.
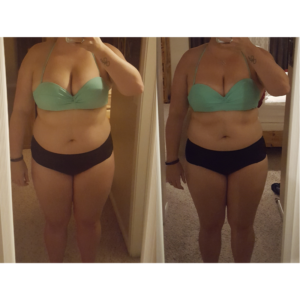
Note: I cropped this photo to use it as an example, please don’t crop yours
♥ BONUS: (optional) Take a photo of your weight on the scale. Step on your scale and snap a picture of the weight you see. (Like this)
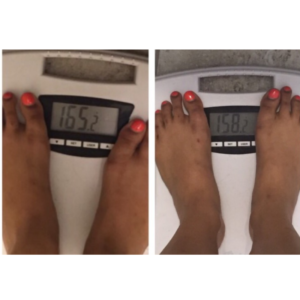
Note: I put this photo in a grid, please don’t edit yours
♥ Don’t Edit Your Photos in any way: No edited photos are accepted. This includes filters, adding text, changing the lighting, cropping or putting your photos in a collage. The only editing done to photos should be changing the name.
♥ Rename your photos! Name your photos Your Name + Before or After + Front/Side/Scale – Please don’t submit photos without naming them first… otherwise I won’t know they’re yours!
WHEN TO TAKE YOUR PHOTOS
The ideal time of day to take your picture is in the morning before you start and the morning after the last day.
Tip: Try to take your photos before you eat anything and after you use the bathroom.
Reset Cleanse
- The Reset Cleanse is 7 days long:
- Take your before photo on Day 1 before you start (eat/drink) anything.
- Take your after photo the morning of Day 8, before you eat/drink anything.
- For example, if you start on a Monday, then Sunday would be your 7th day.
You would take your photos Monday morning before you start. Your last full Reset day Sunday. Take your After photo Monday morning, on Day 8, before you eat/drink anything.
Note: If you continue on with another program your Reset “after photo” from Day 8 will become your ‘Before’ photo for your next program.
TOTAL TRANSFORMATION PROGRAM
- The Total Transformation is 4 weeks long:
- Take your before photo on Day 1 before you start week 1.
- Take your after photo on Day 29, the day after Week 4 ends.
LAZY GIRL EXERCISE PROGRAM
- Each Phase of the Lazy Girl Exercise Program is 4 weeks long – There are 3, 4-week Phases
- Take your before photo on Day 1 before you start week 1.
- Take your after photo on Day 29, the day after Week 4 of Phase 1 ends.
- Note: Your Phase 1 ‘after’ photo will also be your Phase 2 ‘before’ photo
- Take your after photo on Day 29, the day after Week 4 of Phase 2 ends.
- Take a photo the same way after Phase 3
MIND RIGHT, BODY TIGHT®
- Take your before photo on Day 1 before you start week 1.
- If you do the Reset Cleanse, take your ‘after photo on the morning of day 8.
- Your Reset Cleanse after photo will be the ‘start’ photo for the next 4 week Phase
- Take an ‘after’ photo on Day 29, the day after Week 4 ends.
- Note: Your ‘after’ photo will also be your next 4 week phase ‘before’ photo
- Take a photo the same way every 4 weeks until you reach your goal weight
HOW TO MAKE A TESTIMONIAL VIDEO
HOW TO TAKE A TESTIMONIAL VIDEO
HOW TO SHOOT YOUR VIDEO (OPTIONAL):
- Use your phone: Hold your phone sideways so it’s sideways/wide screen – not tall up/down – don’t worry about editing it or anything.
- If you want to record using your own camera, or computer that’s fine, too! Make sure you’re recording in .MP4 format!
- Hold your phone or prop it up against something – I recommend facing a window with bright light coming onto your face.
- Make sure your audio is on! Do a test video before starting to make sure you can see and hear yourself talking. Make sure you’re recording in .MP4 format!
- Answer the following questions in your video – I recommend reading the questions, then record your answer. Pause to read the next question…then reply – Don’t pause the video! This takes approx. 5 minutes (or less)
- Don’t stop recording between questions, I need one video
WHAT TO DO IN YOUR VIDEO
- I need to see/hear you sharing your results in your video.
- You’ll see a list of questions below.
- Answer those questions in your video!
- Press record and read the question then look at the camera and share your answer.
- Pause to read the next question, then answer it – BUT DON’T PAUSE RECORDING.
- I only need one video with answers to all questions.
- Do not make a new video for each question.
TESTIMONIAL VIDEO QUESTIONS::
Answer these questions while recording your video.
- Why did you try this program? What kind of results did you want?
- How did you feel before starting the Program? What kind of weight loss or wellness issues were you feeling prior to starting? Low energy, aches/pains, breakouts/skin stuff, digestive issues, weight issues (plateaus/wanted to lose weight)
- How do you feel now, after using the program? What health benefits (not weight) did you notice? Any improvements in your: Energy, skin, bloat, digestive issues, habit awareness, motivation, confidence? Let me know in the video!
- How long did it take for you to feel results?
- Did anyone else notice a chance in the way you look and feel?
- How much weight did you lose?
- What advice would you give to someone about to try this program? What advice would you give them?
That’s it!
HOW TO SEND YOUR VIDEO:
- Once you’re done, save the .mp4 video file.It’ll (most likely) be too big to email!
- Rename your video with YOUR NAME so I know it’s yours!
- You can use a free file transfer service – I recommend Dropbox! It’s free.
- Create a free Dropbox account (Takes 2 seconds)
- Add your video to Dropbox.
- NOTE: It takes time for the video to fully upload. Wait until it uploads before sharing it! Otherwise, it’ll be blank.
- Once your video is uploaded, click ‘share’ and you’ll get a link.
- COPY THE LINK AND PASTE IT IN THE RESULTS SURVEY – Don’t set restrictions to view or download this link.
- DO NOT LIMIT TIME TO DOWNLOAD YOUR VIDEO – DON’T DELETE YOUR VIDEO UNTIL YOU HEAR FROM ME
- I will confirm when I’ve seen your video – You can delete the video after you receive that confirmation email.
-
WHAT TO DO WITH YOUR VIDEO LINK:
- Paste the video link in the Results Survey (below and in your program’s dashboard) and submit the video link along with your photos at the same time!
- Make sure you rename your photos and video according to the instructions.
WHAT TO DO WITH YOUR PHOTOS
Submit your ‘Before’ photos along with your ‘After’ photos when you reply to my Check-in emails. You can also share your Results in the Results Survey by clicking the button below.
Return to the Main Dashboard